

If you’re building or renovating a house, chances are you’ll be working in rooms that require waterproofing. This is an incredibly important process and getting it wrong could result in very costly repairs in future. So, in this blog, we’ll share all the basics you need to know about waterproofing, along with some tips to ensure the highest quality possible.
TYPES OF WATERPROOFING
When it comes to internal waterproofing, you’ll most likely come across three different types:
Liquid membranes
Easily the most common type of internal waterproofing, this is typically made with polyurethane or acrylic and can be painted onto a surface where it dries into a waterproof layer. It’s easy to apply on both flat and irregular surfaces, and remains flexible after drying which can reduce the chance of cracks. It must, however, be applied very carefully to ensure there are no gaps and you’ll typically need to apply multiple coats.
Cementitious
This comes as a cement-based paste which is typically applied to concrete or masonry surfaces where it hardens into a watertight layer. It’s breathable, durable and easy to apply but not as flexible as liquid membranes. It’s best for areas with standing water like swimming pools but can still be a good option in tiled wet areas.
Sheet membranes
These are pre-made waterproof sheets that are adhered to the chosen surface. They’re durable, long-lasting and have a consistent thickness which makes tiling easy. They can, however, be difficult to install, especially over joints where care needs to be taken to ensure the membrane is well-sealed. They’re ideal for large areas or where extra durability is important.
APPLICATION
Application methods will differ depending on the product and brand that you’re using. At Arklen, we typically use ARDEX WPM 155 Rapid Plus, a liquid polyurethane-acrylic hybrid membrane that dries quickly. We always try to exceed minimum application standards, but to give you some idea of the process, this is how we’d apply this product.
Clean the space and ensure all surfaces are free of dust and other contaminants.
Apply a flexible tape to all junctions and around plumbing connections—this will allow for movement and reduce the chances of the waterproofing cracking in these areas.
Use a brush to apply a coat in these same areas, making sure to completely cover the tape. When applying to the waste outlet, continue the coat a few centimetres down into the pipe.
Use a roller to apply one coat to the walls and floor, rolling in a single direction (e.g. vertically or horizontally).
Leave to dry for two hours.
Apply a second coat, rolling in the opposite direction from your last application—if you applied the first coat vertically, apply the second coat horizontally.
Let dry for four hours (this product has a very short drying time so most will be significantly longer).
You’re now ready to start tiling.
Videos of tape and waterproofing applications can be found on the Ardex website.
MINIMUM STANDARDS
The National Construction Code has some minimum waterproofing requirements that must be adhered to Australia-wide.These are just the minimum standards, though, and at Arklen we like to ensure all our projects are built with durability and longevity in mind. For this reason, where we feel the benefits outweigh the additional costs, we usually go above these standards. Some ways we do this include:
Treat every bathroom as a wet room: In the bathroom, water is very rarely contained to the shower, so it’s best to treat this space as a wet room and apply waterproofing 1800mm high on all walls, not only in the shower.
Waterproof the laundry and powder rooms too: There’s no need to waterproof as high as in the bathroom, but it’s still possible for these rooms to experience water damage, especially if they flood. So, here, we always recommend some waterproofing, usually up to 150mm off the floor.
Waterproof twice for light-frame: In timber-framed wet areas, we’ll waterproof both before and after the screed to provide an extra layer of protection to the timber.


WATERPROOFING CHALLENGES
Renovations
When renovating a bathroom, it’s very common for clients to question if it’s necessary to re-waterproof the entire room. While this isn’t actually regulated, there’s a very good chance you’ll need to. The reason for this is that you always need to overlap new waterproofing a few centimetres over the old to ensure there are no cracks. Unfortunately, there’s no way to apply this overlap without pulling up more tiles, which can then damage the waterproofing further past where you’d intended to place the overlap. While it is possible to pull the tiles up without damaging the waterproofing, it’s very difficult and you’ll likely need to re-do the entire room anyway. For this reason, we’ll always quote for the entire room, even if the goal is only to do a part of it.
Windows
Waterproofing around windows (which usually aren’t designed for wet areas) can also be quite challenging. Solutions vary and can include tiling to the window and applying a silicone sealant or (the better option) cutting into the wall to embed the frame within it. Just be aware that your builder will likely need some extra time to work out the best solution.


TRADE SECRETS
Make sure your builder hires good trades: In WA, waterproofing inspections aren’t mandatory, so you want to be extra certain that your trades will do a good job.
Be careful on your internal corners: When applying to internal corners, ensure there are no gaps behind the tape or waterproofing. If there’s even a slight curve in the waterproofing, you run the risk of fracturing it as you install the tiles. Movement, especially in light-frame homes, can also fracture loose waterproofing.
Plan your drains: If your home has a concrete slab, the type and placement of your drains will need to be chosen at the very beginning of your build. We recommend opting for a linear grate, as these only require two falls and can seamlessly line up with tiles, compared to circular grates which require four falls and more tile cuttings.
Be careful with nib walls: Depending on where these are built in relation to the drains and floor slope, they can sometimes trap water. Always ensure the floor slopes away from a nib wall or install a drain.
Waterproofing in-built baths: For a more seamless design, we seal in-built baths by installing a small physical barrier (only a couple of cm high) just inside the lip of the bath. This will stop water leaking under the bath in the same way silicone does, but looks much cleaner.
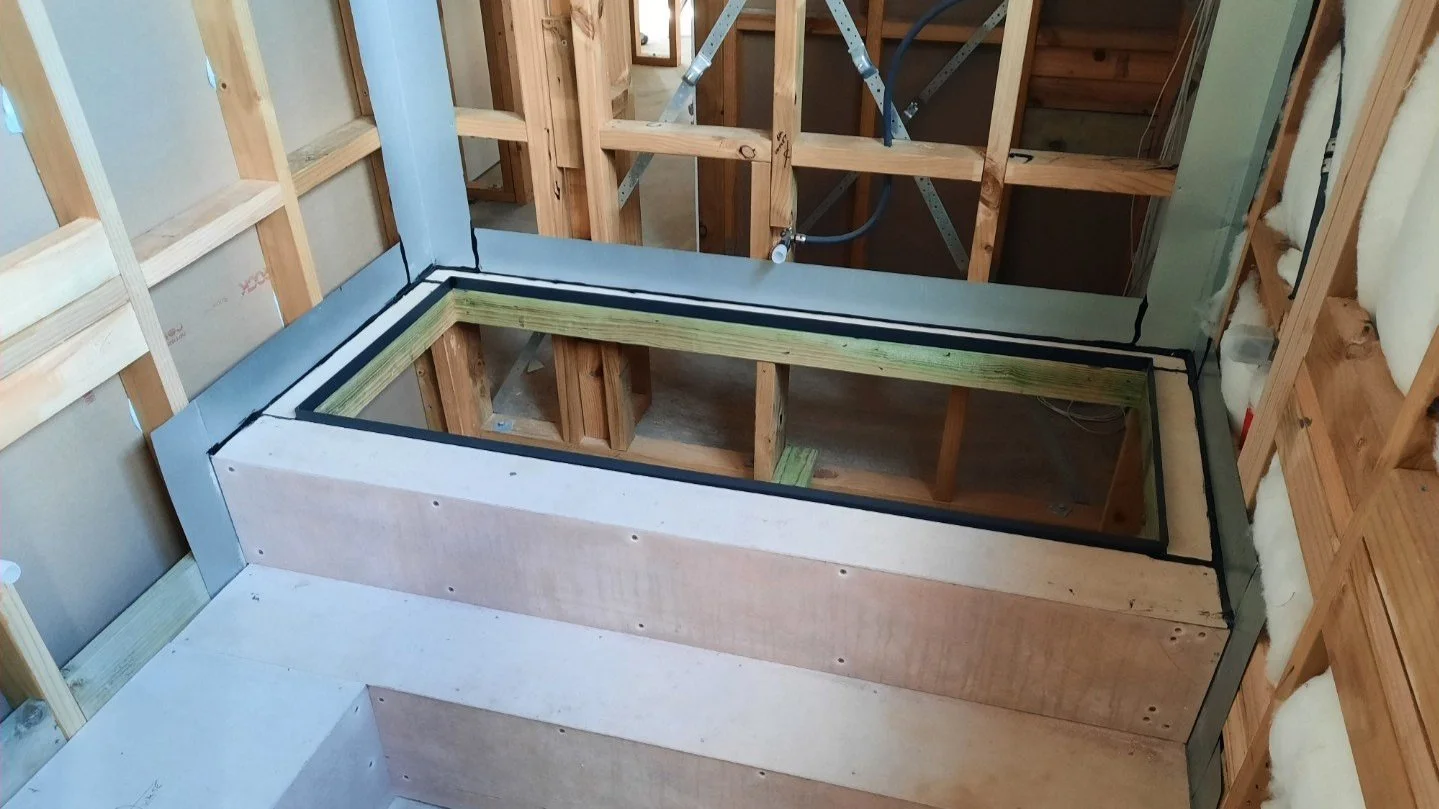
Here, you can see the black lip that will sit just inside the lip of the bath and block any water leakage.